JAX(VMAP & PMAP)

如果我了解TensorFlow/Torch,为什么还要去学习JAX?尽管有n个理由,但我将介绍JAX中的一个概念,足以说服您尝试一下。我们将研究自动矢量化。我们接下来将讨论两种转换,即vmappmap

1
2
3
4
5
6
7
8
9
10
11
12
13
14
15
16
17
18
19
20
21
22
23
24
25
26
27
28
29
30
31
32
33
34
35
36
37
38
39
40
41
import os
import cv2
import glob
import time
import urllib
import requests
import numpy as np
import matplotlib.pyplot as plt
import jax
import jax.numpy as jnp
from jax import random
from jax import make_jaxpr
from jax.config import config
from jax import grad, vmap, pmap, jit

if 'TPU_NAME' in os.environ:
if 'TPU_DRIVER_MODE' not in globals():
url = 'http:' + os.environ['TPU_NAME'].split(':')[1] + ':8475/requestversion/tpu_driver_nightly'
resp = requests.post(url)
TPU_DRIVER_MODE = 1
config.FLAGS.jax_xla_backend = "tpu_driver"
config.FLAGS.jax_backend_target = os.environ['TPU_NAME']
print('Registered TPU:', config.FLAGS.jax_backend_target)
print("")
print("TPU devices found:")
for device in jax.devices():
print(device)
else:
print('No TPUs found!".')

# Registered TPU: grpc://10.0.0.2:8470

# TPU devices found:
# TPU_0(host=0,(0,0,0,0))
# TPU_1(host=0,(0,0,0,1))
# TPU_2(host=0,(1,0,0,0))
# TPU_3(host=0,(1,0,0,1))
# TPU_4(host=0,(0,1,0,0))
# TPU_5(host=0,(0,1,0,1))
# TPU_6(host=0,(1,1,0,0))
# TPU_7(host=0,(1,1,0,1))

介绍

简单地说,自动向量化是一种将对单个示例进行操作的过程转换为可以对向量进行操作的方法。让我们举一个非常基本的例子来理解这一点。假设您有两个数组:

  • Array 1 => 1 2 3 4 5
  • Array 2 => 10 20 30 40 50

您想要对这两个数组执行元素加法运算。一种方法是使用循环。

1
2
3
result = []
for i in range(5):
result.append(array_1[i] + array_2[i])

虽然这是对的,但这只是一次执行一项操作。所有元素的添加过程都是相同的。因此,这是一种一次性执行所有元素加法。例如,您在numpy中执行此操作的方式:res = array_1 + array_2,在开始vmap转换之前,我们将通过一些基本示例来演示vmap的需求和优点。第一个示例重点关注两个向量的简单点积。

1
2
3
4
5
6
7
8
9
10
11
12
13
14
15
16
17
def dot_product(array1, array2):
"""Performs dot product on two jax arrays."""
return jnp.dot(array1, array2)

def print_results(array1, array2, res, title=""):
"""Utility to print arrays and results"""
if title:
print(title)
print("")
print("First array => Shape: ", array1.shape)
print(array1)
print("")
print("Second array => Shape: ", array2.shape)
print(array2)
print("")
print("Results => Shape: ", res.shape)
print(res)
两个向量的点积
1
2
3
4
5
array1 =  jnp.array([1, 2, 3, 4])
array2 = jnp.array([5, 6, 7, 8])
res = dot_product(array1, array2)

print_results(array1, array2, res, title="Dot product of two vectors")

结果输出为:

1
2
3
4
5
6
7
8
9
10
Dot product of two vectors

First array => Shape: (4,)
[1 2 3 4]

Second array => Shape: (4,)
[5 6 7 8]

Results => Shape: ()
70
一批向量的点积

如果您有一批向量,您将如何对两个数组中的每对向量执行点积?

  • 使用循环:循环批量大小并对每对执行点积,存储结果并返回。
  • 使用像einsum这样的矢量化运算。
  • 使用两个或多个向量化运算的组合,例如元素乘积,后跟元素求和。这里的element指的是batch中的一个向量。
1
2
3
4
5
6
7
8
9
10
11
12
13
14
15
16
17
18
19
20
21
22
23
24
25
26
27
28
29
30
31
32
33
# What if we want to do this for a batch of vectors?
array1 = jnp.stack([jnp.array([1, 2, 3, 4]) for i in range(5)])
array2 = jnp.stack([jnp.array([5, 6, 7, 8]) for i in range(5)])

# First way to do batch vector product using loops
res1 = []
for i in range(5):
res1.append(dot_product(array1[i], array2[i]))
res1 = jnp.stack(res1)


# In numpy, we can use `einsum` for the same
res2 = np.einsum('ij,ij-> i', array1, array2)

# We can even simplify einsum and chain two oprations to
# achieve the same
res3 = np.sum(array1*array2, axis=1)

# Let's check the results
print_results(array1,
array2,
res1,
title="1. Dot product on a batch of vectors using loop")
print("="*70, "\n")
print_results(array1,
array2,
res2,
title="2. Dot product on a batch of vectors in numpy using einsum")
print("="*70, "\n")
print_results(array1,
array2,
res3,
title="3. Dot product on a batch of vectors using elementwise multiplication and sum")

VMAP介绍

vmap只是像jit一样的另一种转换。它将函数作为输入以及输入和输出的维度,函数将在其中映射以创建向量化函数。vmap的语法是这样的:vmap(function, in_axes, out_axes, ...)这里的function是您要向量化的函数。in_axes是表示原始函数输入中的批次维度的轴索引。同样,out_axes是表示输出中批次维度的轴索引。提示:仔细阅读位置参数和关键字参数及其对in_axesout_axes的影响。当您使用vmap转换函数时,它返回的函数是原始函数的矢量化版本。让我们看看它的实际效果:

1
2
3
4
5
6
7
# Transform the `dot_product` function defined above
# using the `vmap` transformation
batch_dot_product = vmap(dot_product, in_axes=(0, 0))

# What does the transformation return?
batch_dot_product
# <function __main__.dot_product(array1, array2)>

batch_dot_product只是另一个函数,是原始dot_product函数的转换版本。这就是获得以矢量化方式运行的版本所需要做的全部工作。现在让我们使用转换后的版本batch_dot_product来对一批向量进行点积。

1
2
3
# Using vmap transformed function
res4 = batch_dot_product(array1, array2)
print_results(array1, array2, res4, title="Dot product of a batch of vectors using vmap")

结果输出为:

1
2
3
4
5
6
7
8
9
10
11
12
13
14
15
Dot product of a batch of vectors using vmap
First array => Shape: (5, 4)
[[1 2 3 4]
[1 2 3 4]
[1 2 3 4]
[1 2 3 4]
[1 2 3 4]]
Second array => Shape: (5, 4)
[[5 6 7 8]
[5 6 7 8]
[5 6 7 8]
[5 6 7 8]
[5 6 7 8]]
Results => Shape: (5,)
[70 70 70 70 70]

注意:这两个参数不一定需要具有批量维度。例如,我们可以采用一个向量并与一批向量执行点积。对于没有批量维度的输入,您可以在in_axes(..)参数中传递None。举个例子就清楚了。

1
2
3
4
5
6
7
8
9
10
11
12
13
14
15
16
# A vector
array1 = jnp.array([1, 2, 3, 4])

# We have a batch of vectors as well already `array2` which looks like this
# [[5 6 7 8]
# [5 6 7 8]
# [5 6 7 8]
# [5 6 7 8]
# [5 6 7 8]]

# We will now perform the dot product of array1 (a single vetor) with a batch
# of vectors (array2 in this case). We will pass `None` in the `in_axes(..)` argument
# to say that the first input doesn't have a batch dimension

res5 = vmap(dot_product, in_axes=(None, 0))(array1, array2)
print_results(array1, array2, res5, title="Only one of the inputs in batched")

结果输出为:

1
2
3
4
5
6
7
8
9
10
11
12
13
Only one of the inputs in batched
First array => Shape: (4,)
[1 2 3 4]
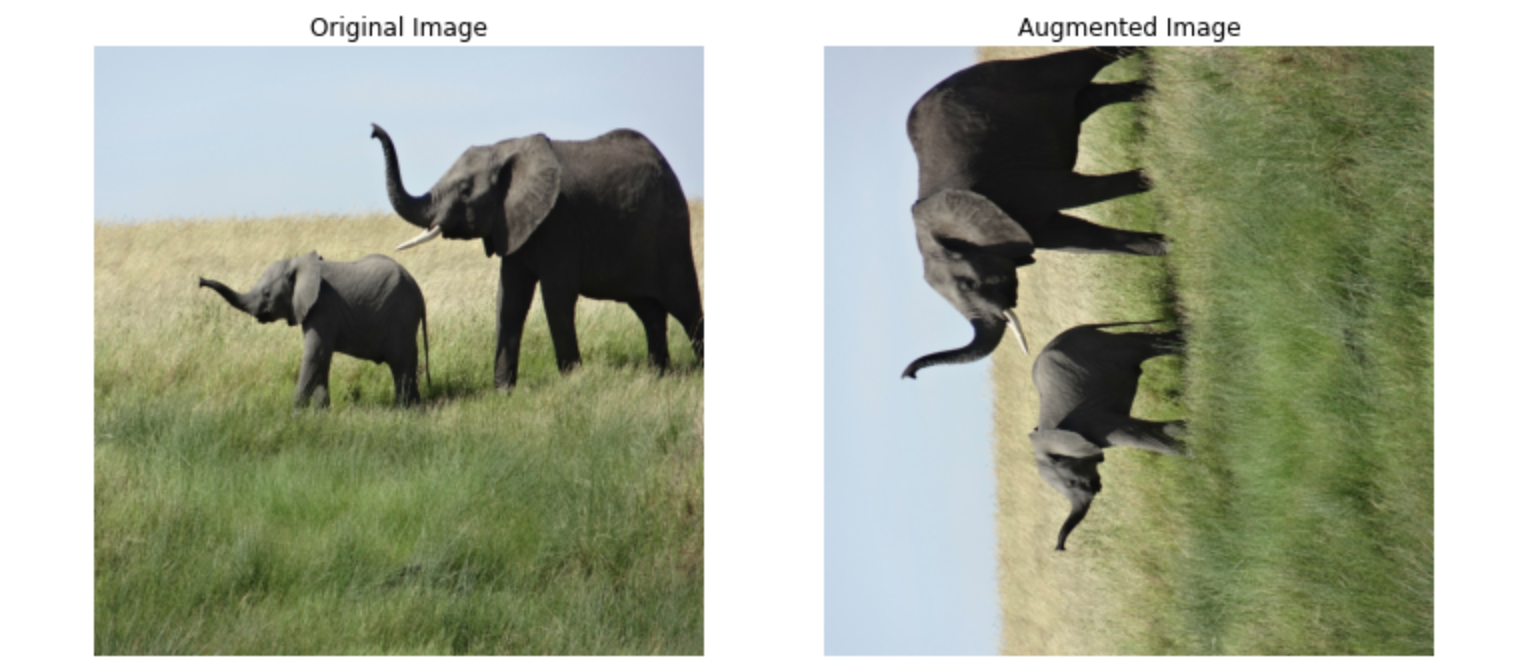
Second array => Shape: (5, 4)
[[5 6 7 8]
[5 6 7 8]
[5 6 7 8]
[5 6 7 8]
[5 6 7 8]]

Results => Shape: (5,)
[70 70 70 70 70]

Vmap 和 Jaxpr

JIT一样,您可以采用vmap转换函数并检查相应的jaxpr以了解操作的执行方式。这是JAX的另一件很酷的地方。您可以采用任何转换后的函数jaxpr。让batch_dot_product函数执行此操作。

1
2
# Like JIT, you can inpsect the transformation using jaxprs
make_jaxpr(vmap(dot_product, in_axes=(None, 0)))(array1, array2)

数据增强-构建简单、快速且可扩展的管道

到目前为止我们所做的几乎没有表现出vmap的真正威力。我们将通过一个更复杂的操作示例来展示vmap的真正强大和灵活性。这也会让您了解为什么使用vmappmap感觉像是一种超能力。因为我喜欢图像,所以我们将在JAX中构建图像数据增强管道。然后我们将使用vmappmap对其进行缩放。在整个过程中我们将执行以下步骤:

  • Google images下载一批图片。
  • 查看图片并将其调整为适当的尺寸。
  • 我们将构建一个管道来对单个图片进行增强。
  • 我们将使用相同的管道为同一图片生成一批增强。
  • 然后,我们将使用相同的管道对一批图片进行增强。
  • 然后,我们将扩展相同的管道,在并行设备(GPU/TPU)上对更大的批量图片进行增强。
第1步:下载一批图片
1
2
3
4
5
6
7
8
9
10
11
12
13
14
def download_images():
urllib.request.urlretrieve("https://i.imgur.com/Bvro0YD.png", "elephant.png")
urllib.request.urlretrieve("https://images-eu.ssl-images-amazon.com/images/I/A1WuED4KiRL.jpg", "cat.jpg")
urllib.request.urlretrieve("https://upload.wikimedia.org/wikipedia/commons/1/18/Dog_Breeds.jpg", "dog.jpg")
urllib.request.urlretrieve("https://upload.wikimedia.org/wikipedia/commons/1/1e/The_Korean_Lucky_Bird_%28182632069%29.jpeg", "bird.jpg")
urllib.request.urlretrieve("https://upload.wikimedia.org/wikipedia/commons/e/ea/Vervet_Monkey_%28Chlorocebus_pygerythrus%29.jpg", "monkey.jpg")
urllib.request.urlretrieve("https://upload.wikimedia.org/wikipedia/commons/f/fa/Puppy.JPG", "puppy.jpg")
urllib.request.urlretrieve("https://upload.wikimedia.org/wikipedia/commons/2/2c/Lion-1.jpg", "lion.jpg")
urllib.request.urlretrieve("https://upload.wikimedia.org/wikipedia/commons/4/41/Siberischer_tiger_de_edit02.jpg", "tiger.jpg")
print("Downloading finished")

# Download the images
download_images()
# Downloading finished
第2步:读取并调整图片大小

虽然我们可以即时读取并调整大小,但我们只有8张图片,因此我们将在增强图片之前读取图片并调整其大小。同样,这两个步骤应该成为您的管道的一部分,我们只是为了简化示例。使用 (800, 800) 作为图片的最终尺寸。

1
2
3
4
5
6
7
8
9
10
11
12
13
14
15
16
17
18
19
20
21
22
23
24
25
26
27
28
29
30
31
32
33
34
35
36
37
38
39
40
41
def read_images(size=(800, 800)):
"""Read jpg/png images from the disk.

Args:
size: Size to be used while resizing
Returns:
A JAX array of images
"""
png_images = sorted(glob.glob("*.png"))
jpg_images = sorted(glob.glob("*.jpg"))
all_images = png_images + jpg_images

images = []

for img in all_images:
img = cv2.imread(img)
img = cv2.cvtColor(img, cv2.COLOR_BGR2RGB)
img = cv2.resize(img, size)
images.append(img)

return jnp.array(images)


# Read and resize
images = read_images()
print("Total number of images: ", len(images))

# Utility function for plotting the images
def plot_images(images, batch_size, num_cols=4, figsize=(15, 8), title="Images "):
num_rows = batch_size // num_cols

_, ax = plt.subplots(num_rows, num_cols, figsize=figsize)

for i, img in enumerate(images):
ax[i // num_cols, i % num_cols].imshow(images[i])
ax[i // num_cols, i % num_cols].axis("off")
#ax[i // num_cols, i % num_cols].set_title(str(i+1))

plt.tight_layout()
plt.suptitle(title, x=0.5, y=1.0, fontsize=16)
plt.show()
第3步:一个非常简单的增强管道

我们将从一个非常基础且简单的增强管道开始。使用单个图片作为输入,管道将返回图片的增强版本。增强管道将旋转输入图片或保持原样,具体取决于布尔值,其中0表示不旋转,而1表示将图片旋转90度。

1
2
3
4
5
6
7
8
9
10
11
12
13
14
15
16
17
18
19
20
21
22
23
24
25
26
27
28
29
30
31
32
33
34
35
36
37
38
def rotate_img(img):
return jnp.rot90(img, axes=(0, 1))

def identity(img):
return img

def random_rotate(img, rotate):
"""Randomly rotate an image by 90 degrees.

Args:
img: Array representing the image
rotate: Boolean for rotating or not
Returns:
Either Rotated or an identity image
"""

return jax.lax.cond(rotate, rotate_img, identity, img)

# Run the pipeline on a single image
# Get an image
img = images[0]
img_copy = img.copy()

# Pass the image copy to augmentation pipeline
augmented = random_rotate(img_copy, 1)

# Plot the original image and the augmented image
_, ax = plt.subplots(1, 2, figsize=(12, 8))

ax[0].imshow(img)
ax[0].axis("off")
ax[0].set_title("Original Image")

ax[1].imshow(augmented)
ax[1].axis("off")
ax[1].set_title("Augmented Image")

plt.show()
步骤4:从单个图片生成多个增强图片

我们现在将使用vmap从同一管道生成n个图片。为了简单起见,我们将保持n=8。从这里你将认识到vmap的强大之处。

1
2
3
4
5
6
7
8
9
10
11
12
13
14
15
16
17
18
19
20
21
22
23
24
25
26
27
28
29
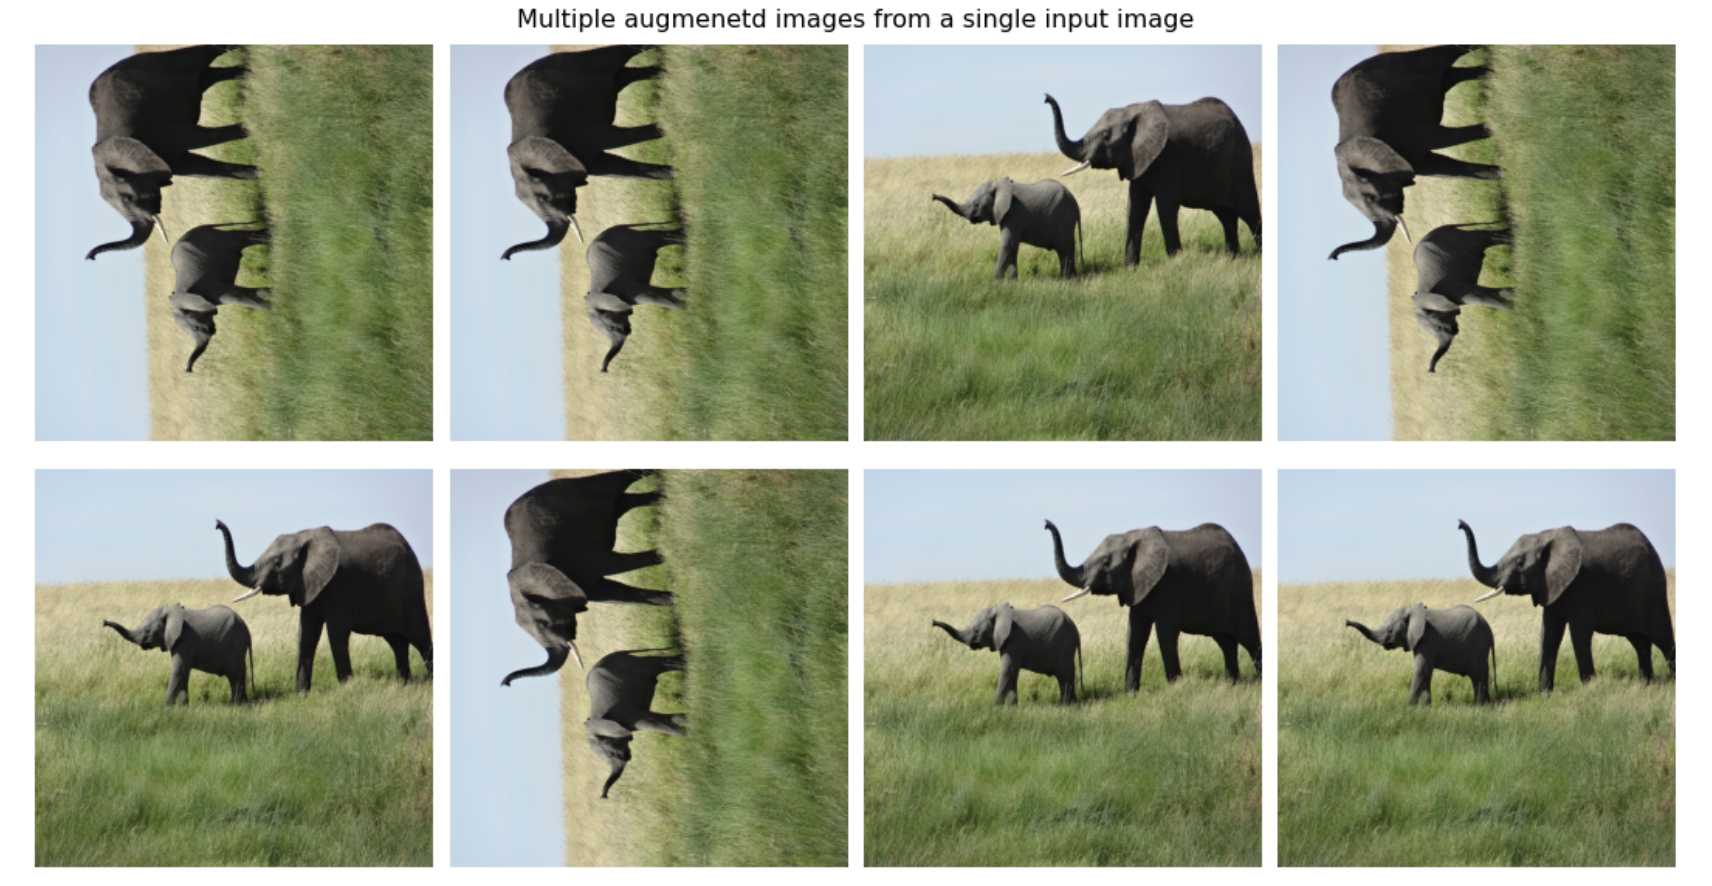
# Using the same original image
img_copy = img.copy()

# Batch size of the output as well as for the boolean array
# used to tell whether to rotate an input image or not
batch_size = 8

# We use seed for anything that involves `random`
key = random.PRNGKey(1234)

# Although splitting is not necessary as the key is only used once,
# I will just leave the original key as it is
key, subkey = random.split(key)
rotate = random.randint(key, shape=[batch_size], minval=0, maxval=2)

# Return identical or flipped image via augmentation pipeline
# We will transform the original `random_rotate(..)` function
# using vmap
augmented = vmap(random_rotate, in_axes=(None, 0))(img_copy, rotate)

print("Number of images to generate: ", batch_size)
print("Rotate-or-not array: ", rotate)
plot_images(augmented,
batch_size=8,
title="Multiple augmenetd images from a single input image"
)

# Number of images to generate: 8
# Rotate-or-not array: [1 1 0 1 0 1 0 0]

因此,我们只是重用了相同的管道来增强单个图片。

步骤5:使用相同的增强管道来增强一批图片

在上一步中,我们使用一张图片一次性生成了一批增强图片。这与我们看到vmapped函数的输入与其他批处理的类似。我们将重用相同的管道来增强一批输入图片,即

  • 向管道提供一批输入图片。
  • 增加输入批次。
  • 获取一批增强图片。

现在,我们使用一开始下载的8张图片作为输入批次。在我们对这些图片运行增强管道之前,让我们先绘制一次原始图片。

1
2
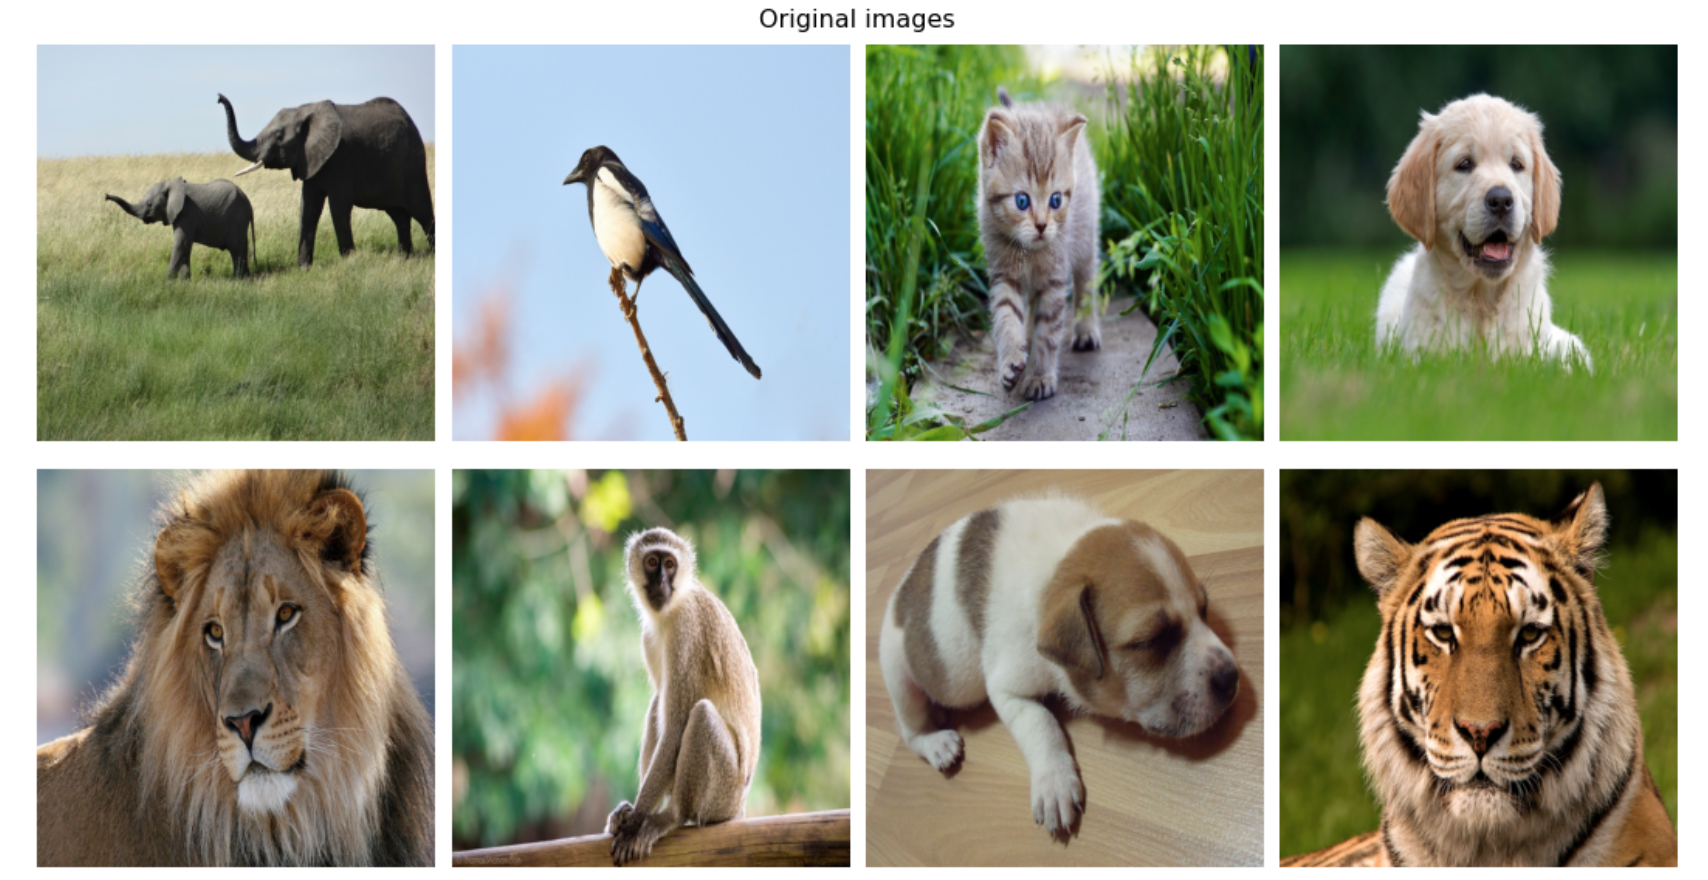
# Original images
plot_images(images, batch_size=8, title="Original images")

我们现在增加这批输入图片。仔细查看in_axes()参数的输入。

1
2
3
# Augment a batch of input images using the same augmentation pipeline
augmented = vmap(random_rotate, in_axes=(0, 0))(images, rotate)
plot_images(augmented, batch_size=8, title="Augmented Images")

由于vmap只是另一种转换,而且我们都知道JAX允许组合这些转换。为了使这个管道更快,我们可以使用jit vmapped函数。

1
2
3
4
5
6
7
8
9
10
11
# JIT the vmapped function
vmap_jitted = jit(vmap(random_rotate, in_axes=(0, 0)))

# Run the pipeline again using the jitted function
augmented = (vmap_jitted(images, rotate)).block_until_ready()

# Plot the images and check the results
plot_images(augmented, batch_size=8, title="Jitting vmapped function")

# Use jaxpr to see how the transformation ops are executed
make_jaxpr(jit(vmap(random_rotate, in_axes=(0, 0))))(images, rotate)

我们编写一个作用于单个图片的函数。

  • 使用vmap转换相同的函数以批量操作。
  • 可以从单个图像生成多个增强图片。
  • 可以批量对不同图片应用增强。
  • 我们可以jit整个vmap转换。
  • 我们可以使用jaxprs检查整个过程。
第6步:快速且可扩展的数据增强管道

我们将添加更多增强功能,使其计算量更大。如果你愿意,你也可以定义你的增强,我们将使用三种不同的增强,即

  • 随机旋转度数。
  • 随机水平翻转。
  • 随机垂直翻转。
1
2
3
4
5
6
7
8
9
10
11
12
13
14
15
16
17
18
19
20
21
22
23
24
25
26
27
28
29
30
31
32
33
34
35
36
37
38
39
40
41
42
43
44
45
46
47
48
49
50
51
52
53
54
55
56
57
58
59
60
61
62
63
64
65
66
67
68
69
70
71
72
73
74
75
76
77
78
79
80
81
82
83
84
85
86
87
88
89
90
91
92
93
94
95
96
97
98
99
100
101
102
103
104
def rotate_90(img):
"""Rotates an image by 90 degress k times."""
return jnp.rot90(img, k=1, axes=(0, 1))


def identity(img):
"""Returns an image as it is."""
return img


def flip_left_right(img):
"""Flips an image left/right direction."""
return jnp.fliplr(img)


def flip_up_down(img):
"""Flips an image in up/down direction."""
return jnp.flipud(img)


def random_rotate(img, rotate):
"""Randomly rotate an image by 90 degrees.

Args:
img: Array representing the image
rotate: Boolean for rotating or not
Returns:
Rotated or an identity image
"""

return jax.lax.cond(rotate, rotate_90, identity, img)


def random_horizontal_flip(img, flip):
"""Randomly flip an image vertically.

Args:
img: Array representing the image
flip: Boolean for flipping or not
Returns:
Flipped or an identity image
"""

return jax.lax.cond(flip, flip_left_right, identity, img)


def random_vertical_flip(img, flip):
"""Randomly flip an image vertically.

Args:
img: Array representing the image
flip: Boolean for flipping or not
Returns:
Flipped or an identity image
"""

return jax.lax.cond(flip, flip_up_down, identity, img)


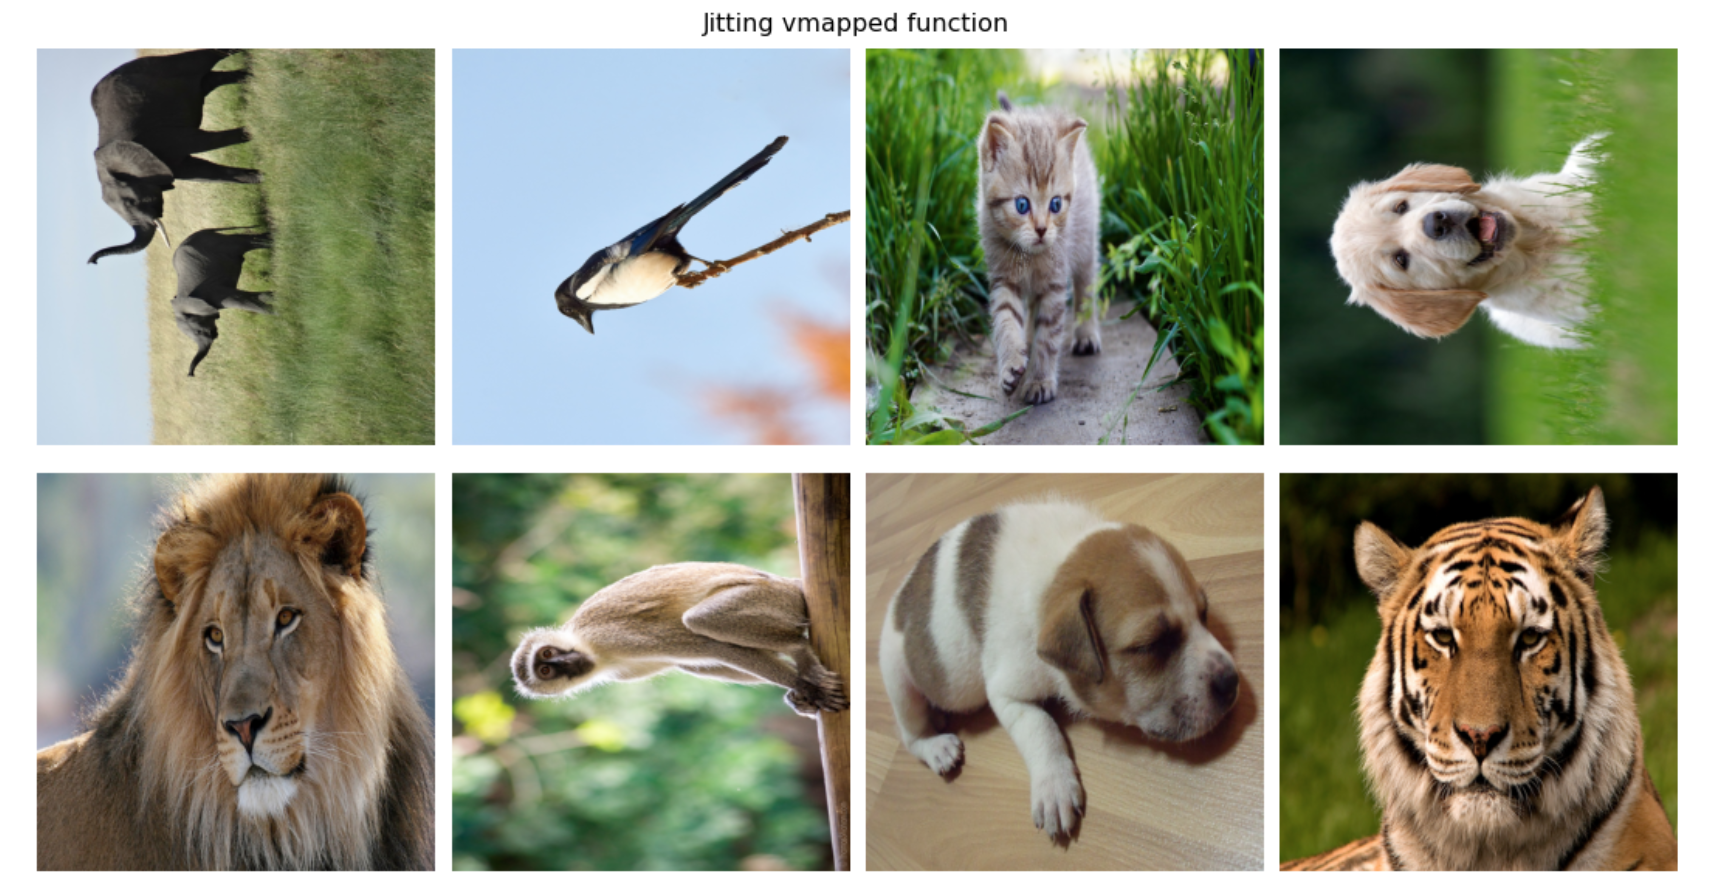
# Get the jitted version of our augmentation functions
random_rotate_jitted = jit(vmap(random_rotate, in_axes=(0, 0)))
random_horizontal_flip_jitted = jit(vmap(random_horizontal_flip, in_axes=(0, 0)))
random_vertical_flip_jitted = jit(vmap(random_vertical_flip, in_axes=(0, 0)))

def augment_images(images, key):
"""Augment a batch of input images.

Args:
images: Batch of input images as a jax array
key: Seed/Key for random functions for generating booleans
Returns:
Augmented images with the same shape as the input images
"""

batch_size = len(images)

# 1. Rotation
key, subkey = random.split(key)
rotate = random.randint(key, shape=[batch_size], minval=0, maxval=2)
augmented = random_rotate_jitted(images, rotate)

# 2. Flip horizontally
key, subkey = random.split(key)
flip = random.randint(key, shape=[batch_size], minval=0, maxval=2)
augmented = random_horizontal_flip_jitted(augmented, flip)

# 3. Flip vertically
key, subkey = random.split(key)
flip = random.randint(key, shape=[batch_size], minval=0, maxval=2)
augmented = random_vertical_flip_jitted(augmented, flip)

return augmented.block_until_ready()

# Because we are jitting the transformations, we will record the
# time taken for augmentation on subsequent calls
for i in range(3):
print("Call: ", i + 1, end=" => ")
key=random.PRNGKey(0)
start_time = time.time()
augmented = augment_images(images, key)
print(f"Time taken to generate augmentations: {time.time()-start_time:.2f}")

# Plot the augmented images
plot_images(augmented, batch_size=8, title="Augmenetd Images")

结果输出为:

1
2
3
Call:  1 => Time taken to generate augmentations: 1.58
Call: 2 => Time taken to generate augmentations: 0.02
Call: 3 => Time taken to generate augmentations: 0.02

使用pmap在多个设备上并行化整个过程

pmapAPI方面与vmap非常相似。vmap执行SIMDpamp执行SMPD。用最简单的术语来说,pmap获取您的Python程序并将其复制到多个设备上以并行运行所有内容。因此,您可以跨多个GPU/TPU并行化工作负载,而不是仅使用一个GPU/TPU。注意:pmap编译底层函数。虽然它可以与jit结合使用,但通常是不必要的。为了在我们的数据增强管道上应用pamp,我们将执行以下步骤:

  • 定义新版本的augment_images函数,因为我们不需要使用pmap进行jit
  • 我们将使用64的批量大小(我们有8TPU设备,并且我们将在单个设备上运行8的批量大小),而不是使用大小为8的批量(因为我们总共有8个图片)。
  • 我将使用相同的8个图片来堆叠它们以创建64的批量。您也可以使用不同的图片。
  • 因为我们原来的augment_images(..)函数接受一个key。我们还需要生成一批key

让我们看看它的实际效果:

1
2
3
4
5
6
7
8
9
10
11
12
13
14
15
16
17
18
19
20
21
22
23
24
25
26
27
28
29
30
31
32
33
34
35
36
37
38
39
40
41
42
43
44
45
46
47
48
49
50
51
52
53
54
55
56
57
58
59
60
61
62
63
64
65
# Augment images function without `jit`
# as jitting is not required while using pmap
# Get the vmapped version of our augmentation functions
random_rotate_vmapped = vmap(random_rotate, in_axes=(0, 0))
random_horizontal_flip_vmapped = vmap(random_horizontal_flip, in_axes=(0, 0))
random_vertical_flip_vmapped = vmap(random_vertical_flip, in_axes=(0, 0))

def augment_images(images, key):
"""Augment a batch of input images.

Args:
images: Batch of input images as a jax array
key: Seed/Key for random functions for generating booleans
Returns:
Augmented images with the same shape as the input images

"""

batch_size = len(images)

# 1. Rotation
key, subkey = random.split(key)
rotate = random.randint(key, shape=[batch_size], minval=0, maxval=2)
augmented = random_rotate_vmapped(images, rotate)

# 2. Flip horizontally
key, subkey = random.split(key)
flip = random.randint(key, shape=[batch_size], minval=0, maxval=2)
augmented = random_horizontal_flip_vmapped(augmented, flip)

# 3. Flip vertically
key, subkey = random.split(key)
flip = random.randint(key, shape=[batch_size], minval=0, maxval=2)
augmented = random_vertical_flip_vmapped(augmented, flip)

return augmented

# Generate a big batch of 64
big_batch_images = jnp.stack([images for i in range(8)])
print("Number of images in batch: ", big_batch_images.shape[0])

# Generate a batch of keys as well as the augment_images
# function accepts a key as well
key = random.PRNGKey(123)
big_batch_keys = [key]

for i in range(7):
key, subkey = random.split(key)
big_batch_keys.append(key)

big_batch_keys = jnp.stack(big_batch_keys)

# Augment images parallely on multiple devices
pmapped_augment_images = pmap(augment_images, in_axes=(0, 0))

# We will run it more than once
for i in range(3):
print("Call: ", i + 1, end=" => ")
start_time = time.time()
augmented_parallel = pmapped_augment_images(big_batch_images, big_batch_keys)
print(f"Time taken to generate augmentations: {time.time()-start_time:.2f}")

# Plot the augmenetd images
augmented_parallel = augmented_parallel.reshape(64, 800, 800, 3)
plot_images(augmented_parallel, batch_size=64, title="Augmentation on parallel devices", figsize=(20, 25))

结果输出为:

1
2
3
Call:  1 => Time taken to generate augmentations: 4.02
Call: 2 => Time taken to generate augmentations: 0.06
Call: 3 => Time taken to generate augmentations: 0.05

我们不仅自动矢量化代码,而且还使其在多个设备上运行,而无需对代码进行任何更改。

注意以下几点

  • 您可以编写适用于单个示例的代码,使用vmap将其矢量化并批量运行它,并且可以使用pmap在多个设备上运行相同的代码。
  • vmap背后的理念是:编写单个示例,批量运行它。
  • 请注意代码中种子的使用。因为随机序列保证是相同的,所以很容易端到端地调试整个过程。
  • 一旦您习惯了vmappmap的模型,就没有回头路了,因为您已经见证了这两种转换的强大。